Calibration is a comparison between measurements – one of known magnitude or correctness made or set with one device and another measurement made in as similar a way as possible with a second device.
The device with the known or assigned correctness is called the
standard. The second device is the
unit under test (UUT), test instrument (TI), or any of several other names for the device being calibrated.
History
The words "calibrate" and "calibration" entered the
English language during the
American Civil War,
[1] in descriptions of
artillery. Many of the earliest measuring devices were intuitive and easy to conceptually validate. The term "calibration" probably was first associated with the precise division of linear distance and angles using a
dividing engine and the measurement of gravitational
mass using a
weighing scale. These two forms of measurement alone and their direct derivatives supported nearly all commerce and technology development from the earliest civilizations until about 1800AD.
The
Industrial Revolution introduced wide scale use of indirect measurement. The measurement of
pressure was an early example of how indirect measurement was added to the existing direct measurement of the same phenomena.

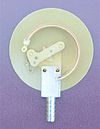
Indirect reading design from front 
Indirect reading design from rear, showing Bourdon tube Before the Industrial Revolution, the most common pressure measurement device was a hydrostatic
manometer, which is not practical for measuring high pressures.
Eugene Bourdonfulfilled the need for high pressure measurement with his
Bourdon tube pressure gage.
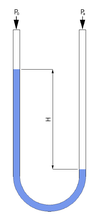
In the direct reading hydrostatic manometer design on the left, unknown pressure pushes the liquid down the left side of the manometer U-tube (or unknown vacuum pulls the liquid up the tube, as shown) where a length scale next to the tube measures the pressure, referenced to the other, open end of the manometer on the right side of the U-tube. The resulting height difference "H" is a direct measurement of the pressure or vacuum with respect to
atmospheric pressure. The absence of pressure or vacuum would make H=0. The self-applied calibration would only require the length scale to be set to zero at that same point.
In a Bourdon tube shown in the two views on the right, applied pressure entering from the bottom on the silver barbed pipe tries to straighten a curved tube (or vacuum tries to curl the tube to a greater extent), moving the free end of the tube that is mechanically connected to the pointer. This is indirect measurement that depends on calibration to read pressure or vacuum correctly. No self-calibration is possible, but generally the zero pressure state is correctable by the user.
Even in recent times, direct measurement is used to increase confidence in the validity of the measurements.
In the early days of US automobile use, people wanted to see the gasoline they were about to buy in a big glass pitcher, a direct measure of volume and quality via appearance. By 1930, rotary
flowmeters were accepted as indirect substitutes. A hemispheric viewing window allowed consumers to see the blade of the flowmeter turn as the gasoline was pumped. By 1970, the windows were gone and the measurement was totally indirect.
Indirect measurement always involve linkages or conversions of some kind. It is seldom possible to intuitively monitor the measurement. These facts intensify the need for calibration.
Most measurement techniques used today are indirect.
[edit]Calibration versus Metrology
There is no consistent demarcation between calibration and metrology. Generally, the basic process below would be metrology-centered if it involved new or unfamiliar equipment and processes. For example, a calibration laboratory owned by a successful maker of
microphoneswould have to be proficient in electronic distortion and
sound pressure measurement. For them, the calibration of a new frequency
spectrum analyzer is a routine matter with extensive precedent. On the other hand, a similar laboratory supporting a
coaxial cable manufacturer may not be as familiar with this specific calibration subject. A transplanted calibration process that worked well to support the microphone application may or may not be the best answer or even adequate for the coaxial cable application. A prior understanding the measurement requirements of coaxial cable manufacturing would make the calibration process below more successful.
[edit]Basic calibration process
The calibration process begins with the design of the measuring instrument that needs to be calibrated. The design has to be able to "hold a calibration" through its calibration interval. In other words, the design has to be capable of measurements that are "within
engineering tolerance" when used within the stated environmental conditions over some reasonable period of time. Having a design with these characteristics increases the likelihood of the actual measuring instruments performing as expected.
The exact mechanism for assigning tolerance values varies by country and industry type. The measuring equipment manufacturer generally assigns the measurement tolerance, suggests a calibration interval and specifies the environmental range of use and storage. The using organization generally assigns the actual calibration interval, which is dependent on this specific measuring equipment's likely usage level. A very common interval in the United States for 8–12 hours of use 5 days per week is six months. That same instrument in 24/7 usage would generally get a shorter interval. The assignment of calibration intervals can be a formal process based on the results of previous calibrations.
The next step is defining the calibration process. The selection of a standard or standards is the most visible part of the calibration process. Ideally, the standard has less than 1/4 of the measurement uncertainty of the device being calibrated. When this goal is met, the accumulated measurement uncertainty of all of the standards involved is considered to be insignificant when the final measurement is also made with the 4:1 ratio. This ratio was probably first formalized in Handbook 52 that accompanied MIL-STD-45662A, an early US Department of Defense metrology program specification. It was 10:1 from its inception in the 1950s until the 1970s, when advancing technology made 10:1 impossible for most electronic measurements.
Maintaining a 4:1 accuracy ratio with modern equipment is difficult. The test equipment being calibrated can be just as accurate as the working standard. If the accuracy ratio is less than 4:1, then the calibration tolerance can be reduced to compensate. When 1:1 is reached, only an exact match between the standard and the device being calibrated is a completely correct calibration. Another common method for dealing with this capability mismatch is to reduce the accuracy of the device being calibrated.
For example, a gage with 3% manufacturer-stated accuracy can be changed to 4% so that a 1% accuracy standard can be used at 4:1. If the gage is used in an application requiring 16% accuracy, having the gage accuracy reduced to 4% will not affect the accuracy of the final measurements. This is called a limited calibration. But if the final measurement requires 10% accuracy, then the 3% gage never can be better than 3.3:1. Then perhaps adjusting the calibration tolerance for the gage would be a better solution. If the calibration is performed at 100 units, the 1% standard would actually be anywhere between 99 and 101 units. The acceptable values of calibrations where the test equipment is at the 4:1 ratio would be 96 to 104 units, inclusive. Changing the acceptable range to 97 to 103 units would remove the potential contribution of all of the standards and preserve a 3.3:1 ratio. Continuing, a further change to the acceptable range to 98 to 102 restores more than a 4:1 final ratio.
This is a simplified example. The mathematics of the example can be challenged. It is important that whatever thinking guided this process in an actual calibration be recorded and accessible. Informality contributes to
tolerance stacks and other difficult to diagnose post calibration problems.
Also in the example above, ideally the calibration value of 100 units would be the best point in the gage's range to perform a single-point calibration. It may be the manufacturer's recommendation or it may be the way similar devices are already being calibrated. Multiple point calibrations are also used. Depending on the device, a zero unit state, the absence of the phenomenon being measured, may also be a calibration point. Or zero may be resettable by the user-there are several variations possible. Again, the points to use during calibration should be recorded.
There may be specific connection techniques between the standard and the device being calibrated that may influence the calibration. For example, in electronic calibrations involving analog phenomena, the impedance of the cable connections can directly influence the result.
All of the information above is collected in a calibration procedure, which is a specific
test method. These procedures capture all of the steps needed to perform a successful calibration. The manufacturer may provide one or the organization may prepare one that also captures all of the organization's other requirements. There are clearinghouses for calibration procedures such as the Government-Industry Data Exchange Program (GIDEP) in the United States.
This exact process is repeated for each of the standards used until transfer standards,
certified reference materials and/or natural physical constants, the measurement standards with the least uncertainty in the laboratory, are reached. This establishes the
traceability of the calibration.
See
metrology for other factors that are considered during calibration process development.
After all of this, individual instruments of the specific type discussed above can finally be calibrated. The process generally begins with a basic damage check. Some organizations such as nuclear power plants collect "as-found" calibration data before any
routine maintenance is performed. After routine maintenance and deficiencies detected during calibration are addressed, an "as-left" calibration is performed.
More commonly, a calibration technician is entrusted with the entire process and signs the calibration certificate, which documents the completion of a successful calibration.
[edit]Calibration process success factors
The extent of the calibration program exposes the core beliefs of the organization involved. The integrity of organization-wide calibration is easily compromised. Once this happens, the links between scientific theory, engineering practice and mass production that measurement provides can be missing from the start on new work or eventually lost on old work.
The 'single measurement' device used in the basic calibration process description above does exist. But, depending on the organization, the majority of the devices that need calibration can have several ranges and many functionalities in a single instrument. A good example is a common modern
oscilloscope. There easily could be 200,000 combinations of settings to completely calibrate and limitations on how much of an all inclusive calibration can be automated.
Every organization using oscilloscopes has a wide variety of calibration approaches open to them. If a quality assurance program is in force, customers and program compliance efforts can also directly influence the calibration approach. Most oscilloscopes are
capital assets that increase the value of the organization, in addition to the value of the measurements they make. The individual oscilloscopes are subject to
depreciation for tax purposes over 3, 5, 10 years or some other period in countries with complex
tax codes. The tax treatment of maintenance activity on those assets can bias calibration decisions.
New oscilloscopes are supported by their manufacturers for at least five years, in general. The manufacturers can provide calibration services directly or through agents entrusted with the details of the calibration and adjustment processes.
Very few organizations have only one oscilloscope. Generally, they are either absent or present in large groups. Older devices can be reserved for less demanding uses and get a limited calibration or no calibration at all. In production applications, oscilloscopes can be put in racks used only for one specific purpose. The calibration of that specific scope only has to address that purpose.
This whole process in repeated for each of the basic instrument types present in the organization, such as the digital multimeter (DMM) pictured below.

A DMM (top), a rack-mounted oscilloscope (center) and control panel
Also the picture above shows the extent of the integration between
Quality Assurance and calibration. The small horizontal unbroken paper seals connecting each instrument to the rack prove that the instrument has not been removed since it was last calibrated. These seals are also used to prevent undetected access to the adjustments of the instrument. There also are labels showing the date of the last calibration and when the calibration interval dictates when the next one is needed. Some organizations also assign unique identification to each instrument to standardize the recordkeeping and keep track of accessories that are integral to a specific calibration condition.
When the instruments being calibrated are integrated with computers, the integrated computer programs and any calibration corrections are also under control.
In the United States, there is no universally accepted
nomenclature to identify individual instruments. Besides having multiple names for the same device type there also are multiple, different devices with the same name. This is before slang and shorthand further confuse the situation, which reflects the ongoing open and intense competition that has prevailed since the Industrial Revolution.
[edit]The calibration paradox
Successful calibration has to be consistent and systematic. At the same time, the complexity of some instruments require that only key functions be identified and calibrated. Under those conditions, a degree of randomness is needed to find unexpected deficiencies. Even the most routine calibration requires a willingness to investigate any unexpected observation.
Theoretically, anyone who can read and follow the directions of a calibration procedure can perform the work. It is recognizing and dealing with the exceptions that is the most challenging aspect of the work. This is where experience and judgement are called for and where most of the resources are consumed.
[edit]Quality
To improve the quality of the calibration and have the results accepted by outside organizations it is desirable for the calibration and subsequent measurements to be "traceable" to the internationally defined measurement units. Establishing
traceability is accomplished by a formal comparison to a
standard which is directly or indirectly related to national standards (
NIST in the USA), international standards, or
certified reference materials.
Quality management systems call for an effective
metrology system which includes formal, periodic, and documented calibration of all measuring instruments.
ISO 9000 and
ISO 17025 sets of standards require that these traceable actions are to a high level and set out how they can be quantified.
[edit]Instrument calibration
Calibration can be called for:
- with a new instrument
- when a specified time period is elapsed
- when a specified usage (operating hours) has elapsed
- when an instrument has had a shock or vibration which potentially may have put it out of calibration
- sudden changes in weather
- whenever observations appear questionable
In general use, calibration is often regarded as including the process of adjusting the output or indication on a measurement instrument to agree with value of the applied standard, within a specified accuracy. For example, a
thermometer could be calibrated so the error of indication or the correction is determined, and adjusted (e.g. via
calibration constants) so that it shows the true temperature in
Celsius at specific points on the scale. This is the perception of the instrument's end-user. However, very few instruments can be adjusted to exactly match the standards they are compared to. For the vast majority of calibrations, the calibration process is actually the comparison of an unknown to a known and recording the results.
[edit]International
In many countries a National Metrology Institute (NMI) will exist which will maintain primary standards of measurement (the main
SI unitsplus a number of derived units) which will be used to provide
traceability to customer's instruments by calibration. The NMI supports the metrological infrastructure in that country (and often others) by establishing an unbroken chain, from the top level of standards to an instrument used for measurement. Examples of National Metrology Institutes are
NPL in the
UK,
NIST in the
United States,
PTB in
Germanyand many others. Since the Mutual Recognition Agreement was signed it is now straightforward to take traceability from any participating NMI and it is no longer necessary for a company to obtain traceability for measurements from the NMI of the country in which it is situated.
To communicate the quality of a calibration the calibration value is often accompanied by a traceable uncertainty statement to a stated confidence level. This is evaluated through careful uncertainty analysis.


